


Written by Kristen, Contributing Writer
This has not been the grandest year for my garden. There’s no abundance of tomatoes to can, no peppers to freeze, and hardly enough basil to make one batch of pesto, but I decided to give myself grace with gardening and not aim for perfection. I’ve realized that even in an off-year with the garden, certain crops always do well.
One of those for us is Swiss chard, and I’ve got more than our family cares to eat. In the past I would lightly steam and freeze it to use in place of frozen spinach in recipes, but it rarely would get completely used up, and I’d rather save the freezer space for something else, like blueberries. I still hate to see it just sit in the garden, though!
The Dehydrator to the Rescue!
My husband really blessed me this year with an Excalibur food dehydrator (Amazon affiliate link), and it’s been a lifesaver when it comes to preserving food with little time and effort from me. After doing lots of peaches, herbs, and some tomatoes, it dawned on me that I should dehydrate the chard for the winter!
Dehydrated chard (or other similar greens) can be added to soups, pastas, breads, smoothies, and more. They take up very little room in the pantry and can quickly add a boost of nutrition to any recipe. Leafy greens are famous for their high content of vitamins and minerals, and having them on-the-ready will be a great help to me this winter and early spring!
How to Dehydrate Chard
The steps to dehydrate chard are so easy! These steps leave you with a dried chard that could still be considered raw. Some people feel that chard and other dark leafies should always be eaten cooked to diminish the oxalic acid in them that can act as an anti-nutrient. If you are concerned about oxalic acid or think that you’ll use your dehydrated greens mostly in smoothies, you can lightly steam the leaves before dehydrating them. I don’t think this will be our primary use, so I dehydrated them raw.
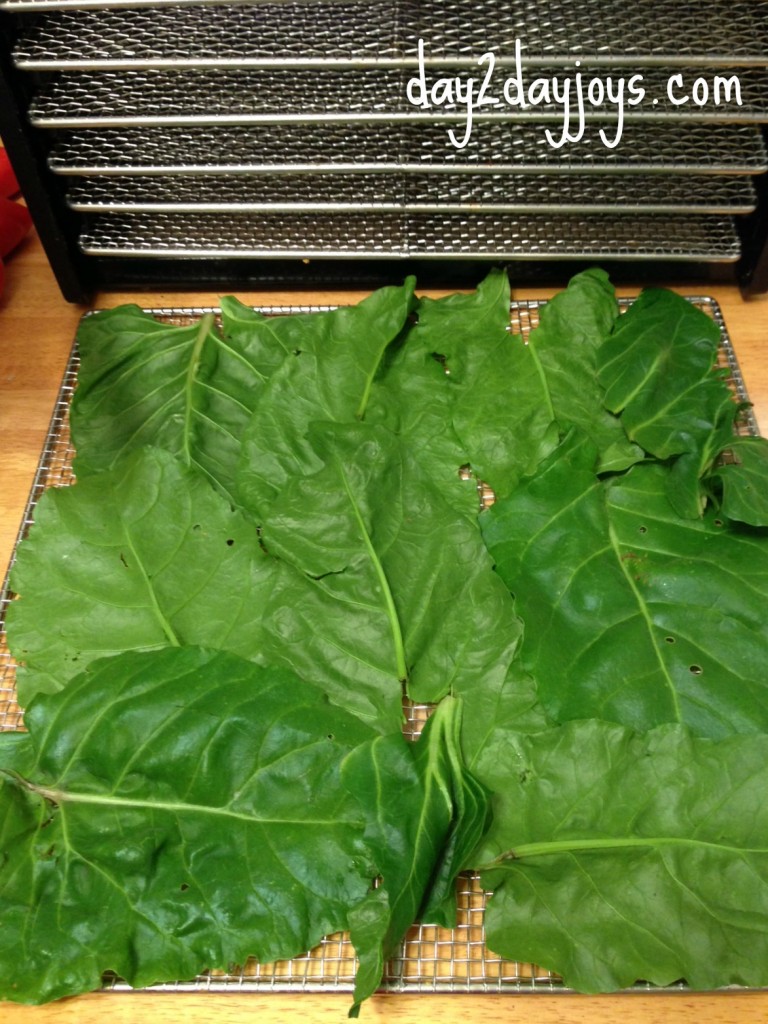
1. Remove the thick stems and veins, and wash the leaves so that they are free of grit. Remove any discolored leaves or sections. (If you want to dehydrate the stems, you certainly can. Just slice them into smaller pieces and expect them to take longer than the leaves.)
2. Lay the leaves on the dehydrator tray in a single layer. A little overlapping is fine, but too much will cause them to dry unevenly and too slowly.
3. Fill up all of the trays, or lay out all of the leaves that you have, and dehydrate the leaves according to your machine’s directions. In my dehydrator, the chard leaves take longer than green herbs, but less time than juicy fruits or vegetables.
4. Once the leaves are completely dry, place them in a food processor. Pulse it to crumble the leaves uniformly.
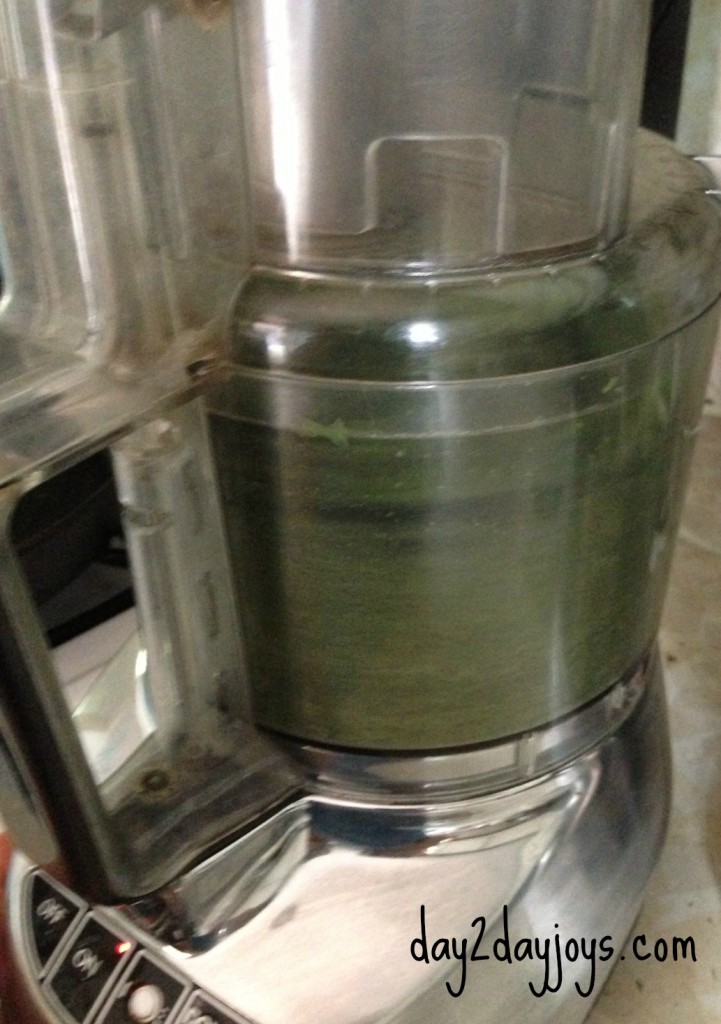
5. Store the dried and crumbled leaves in an airtight container. I prefer glass jars, but plastic freezer bags work as well.
Ta-da! You can now enjoy chard all through the cold winter and early spring months.
It’s amazing how one giant grocery bag filled with chard can be dehydrated down to a quart-sized jar of dried chard! I’m imagining soups, baked pastas, and green tortillas all made with our dried chard.
Have you ever dehydrated greens before, or do you like to freeze them? Is there another veggie that you like to dehydrate for easy food storage? Do share!
*this post is linked to: Encourage One Another, Titus 2sdays, and WFMW*


how long would it take in the oven? would like to do this but don’t have a dehydrator!!
Hmm… you know, I’m not sure! On a very low setting, I would try checking them after a few hours and see how they are coming along, and then just checking every hour or so once they are starting to dry. My oven goes down to 170, and I dry them in the dehydrator at about 120 or so. In my dehydrator it took about 8 hours, I think? Since the air doesn’t circulate in an oven, I’m not sure how that would impact drying time, too.
These are just my best guesses, but I think that as long as your oven temp can stay on the low side, you can easily make it work by keeping an eye on them! If you try it, I’d love to hear how it worked for you!
I’m still dehydrating broccoli. I remember long ago I used to dig up the broccoli plants after the main head was harvested. Little did I know then that the plants are very willing to send out a lot of smaller side shoots… until the plant is either dug up or winter sets in and the garden is tilled.
A person can’t be too squeamish after the initial harvest, though. Once you start seeing the white “butterflies” (they may be moths) it’s pretty much a given that there will be worms. First I soak in a sink of salt water to get rid of all I can. Otherwise –I do believe it is such a blessing that– when blanched, the broccoli is a nice rich green and any tan is… protein I choose to throw away.
I may put the blanched broccoli on a cookie sheet in the freezer. Once I have enough built up I transfer to the dehydrator.
The little dehydrated heads are very tasty just to pop into my mouth — I’m definitely taking some for a snack on a road trip — or they’re ready to pop into a dish or add to a veggie powder.
Neat, Joy! I haven’t tried dehydrated broccoli yet, but I’ve been wondering how they’d taste.
My broccoli is definitely finished for the year. The worms were there in a few places, but a groundhog just finished it all off! Rascal. We need a dog! 😉
I’ll have to try the broccoli next year!
This is sheer brilliance! The crops that grow the best are always the ones wasted here – like kale. It grows so well that I can’t keep up with it – but *everything* else died without bearing hardly a thing! Green superfood powders are soooo expensive, too. This is two birds with one stone! Love it!
Yes! This is so easy and frugal!
I am a bit jealous to hear how well your kale did. The groundhog mentioned above is destroying mine! But there’s still plenty of chard!
This is the first time I really dehydrated anything. Just last week I pulled over 30 bell peppers out of the garden. Apparently, the pepper plants in PA didn’t realize it was fall this year. Yay! I just got a dehydrator, so I dried a bunch of them. I’ve thrown out WAY too much Kale this season (okay, it was mostly composted or fed to a friend’s chickens, but it wasn’t eaten by humans). So when I got Kale in my CSA this past week, I had to try out your approach here. I’ll probably put both the dried peppers and some of the kale into chili. Thanks for the tip!
I see you have a dehydrator that has wire racks, would you tell me the brand or where I can purchase one it looks very durable. I am using a friends and have dehydrated lots of fruites and veg. Made fruit wraps, having lots of fun