The post All Things Pumpkin Ideas appeared first on Day2Day Joys.
]]>There is just something about this time of year that brings out that southern greeting. It’s Fall Y’all and that means pumpkins, pumpkins, pumpkins!
Pumpkin Pie Spice
to get the recipe click here!
*the 2 ideas below originally posted 5 years ago in this post*
Pumpkin Pie Smoothie
This recipe is so very simple! All you need are a few ingredients and a great blender and your set!
What you need:
1/3+ tsp harvest pumpkin spice, depending on your taste
1/2 tsp vanilla extract
1/2 cup frozen pumpkin (cubes from silicone tray)
1/2 cup unsweetened almond milk
1-3 Tbsp honey (or sweetener of your choice)
1/2 scoop vanilla protein powder *optional*
Handful of Ice cubesWhat to Do:
*Add all ingredients into a blender, except protein powder.
*Blend together until desired consistency, add more milk or water as needed.
*Once you have your desired consistency, add in protein powder but only blend until mixed (about 10 seconds or less). If you overdo it, the protein powder will make the smoothie too frothy.
*Enjoy your pumpkin smoothie! Yum!
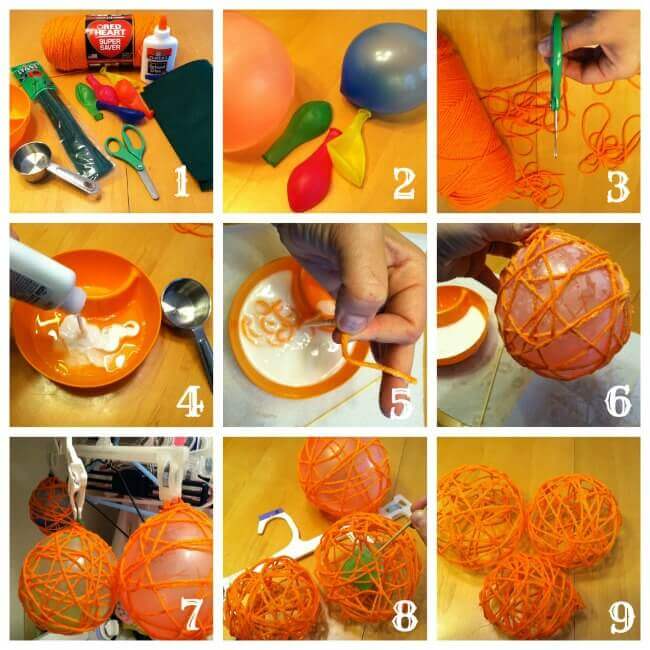
Pumpkin Yarn Craft
What you need:
orange yarn
a couple balloons
multi-purpose glue (like elmer’s or make your own paste with flour and water)
1/4 C water
green pipe cleaners + green felt
scissors
small bowl
plenty of paper towels
What to do:
To make this fun with as little mess as possible (this IS a messy craft), follow these simple steps.
- Gather supplies, decide number of yarn pumpkins you’ll be making
- Blow up your balloons and tie a knot
- Cut yarn in 2-4 feet strips depending on your balloons sizes, set aside (3-5 strips per ballon)
- In a cereal bowl make glue paste using the whole bottle of glue, and 1/4 C water, mix well, set aside
- Dip your yarn into the glue paste, then lightly slide yarn through 2 fingers dripping access glue off
- Wrap yarn around pumpkin, overlapping pieces of yarn to make it sturdy
- Once all yarn is wrapped around balloon, hang dry or set on a jar for 1-2 days
- Once dry, pop balloon and pull thru an opening
- Use the pipe cleaners & felt to make a stem, twirly vines, leaves
Display for all to see, your kids will love their crafty pumpkins!
These 3 ideas are shared in the video below:
And here are more pumpkin ideas found on this blog:
- Spiced Pumpkin Pie
- Gluten-Free Pumpkin Muffins
- Cream Cheese filled Pumpkin Muffins
- Redeeming Halloween
ps. Im curious, if you are a reader here, would you like to see more posts? I have been almost exclusively posting on youtube because this blog lacked interaction and comments but if you all are reading and commenting, I would try more to post here!
-Rachel
The post All Things Pumpkin Ideas appeared first on Day2Day Joys.
]]>The post Why I LOVE Leftover Mashed Potatoes appeared first on Day2Day Joys.
]]>Heading into the holiday season, keeping meals simple is a must. Days are busy with class parties, extra crafting projects, special outings, and much more.
I love planning delicious holiday meals, but for the everyday, ordinary meals I like to keep the menu plan quick and easy.
One thing I try to do when preparing for a busy week or season is to make more than what I need so that I can then repurpose it into another meal or two. I double the rice I need so that fried rice can be made quickly later on. Extra chicken can be turned into many different meals.
And making extra mashed potatoes means I can make one of my favorite repurposed leftover dishes– crispy potato cakes.
My mom made them for us when I was a child and they were a favorite back then too. Crispy on the outside and creamy on the inside, when topped with a little pat of butter, they are so yummy.

Occasionally, I will make crispy potato cakes for a side with dinner, but more often, I like to enjoy potato cakes at breakfast. They pair very well with a fried egg, bacon or ham, and maybe some cheese or greens.
This holiday season, if you have leftover mashed potatoes on hand, try making these crispy potato cakes! They are simple to make and sure to please!
Crispy Potato Cakes:
What you need:
- 2-3 C mashed potatoes
- 1 egg
- 1/2 tsp garlic powder
- 1/2 tsp kosher salt
- 1 Tbsp butter
What to do:
- 1. Mix together potatoes, egg, garlic powder, and salt in a bowl until well-combined.
- 2. Heat a pan over medium-high heat. Melt 1/2 Tbsp butter in the pan. Form half the potato mixture into small patties and place in hot pan. Cook for 5 minutes on each side until crispy, gently turning the potato cake halfway through cooking.
-

- 3. Repeat step 2 with the remaining potato mixture.
- 4. Serve warm with extra butter, if desired.
-

Do you have any easy meal ideas to use up left over potatoes?
The post Why I LOVE Leftover Mashed Potatoes appeared first on Day2Day Joys.
]]>The post Spiced Pumpkin Pie with Flaky Pastry Crust appeared first on Day2Day Joys.
]]>
Written by Kari @ KariNewsom.com, Contributing Writer
Autumn is officially here! At least in Colorado! We are having beautiful and warm days (high 70’s to low 80’s), but the nights are cool and crisp! Leaves are turning bright yellow, orange and red – and the morning has brought a slight haze these past few days.
Typically I am more of a warm-weather person. I’m all about the sun, flip flops and being outside. That being said, I’m still a Colorado girl at heart. I like to get bundled up in chunky sweaters, wool socks and fur lined shoes. I like jumping in the Jeep with my husband and kids, all bundled up, to drive to the mountains to see the Aspen’s turning. And since we’re Colorado natives, no matter what the weather, you roll the windows down, crank the heat and put those hats on and enjoy the drive!
The other thing I like about autumn is that I start spending more time in the kitchen again, making delicious and yummy smelling foods! A few years ago I wanted to make a pumpkin pie – a pie that I’ve never liked. As in ever. I figured it was because store bought pumpkin pies were not close to one made from scratch, so I wanted to try making one COMPLETELY from scratch to see if I could like a real pumpkin pie!
I have to say, when I took the first bite of this from-scratch creation, I instantly became hooked. This is a tad more involved than other recipes – okay, a lot more involved, so make your special occasions more special by incorporating this into the menu. It is absolutely delicious! If you’re already a pumpkin pie lover – then you MUST try this and add it to your favorite’s list! It’s on ours, which is why we included it in my first cookbook – Real Food. Real Kitchen. So Good!

Spiced Pumpkin Pie with
Flaky Pastry Crust
Yield: 2-3 pies
What you need:
*for the flaky pastry crust
- 3 ¾ cups white spelt flour
- 1 tablespoon cane sugar
- 1 1/2 teaspoon sea salt
- 1/2 teaspoon baking powder, aluminum-free
- 1 ¾ cup cold real butter
- 2/3 cups ice cold filtered water
- 2 tablespoons full-fat plain yogurt
- 1 teaspoon white vinegar
*for the spiced pumpkin pie filling and topping
(this will fill at least 2 pie dishes, depending on the size you make – believe me you’ll be glad you have more than one)
- TOPPING
1/2 cup (1 stick) real butter , at room temperature - 1 cup spelt flour
- 2/3 cup packed brown sugar
- 1 cup chopped pecans
- 1 teaspoon cinnamon
- 1 teaspoon vanilla
- FILLING
1 1/2 cups packed dark brown sugar - 1 teaspoon sea salt
- 2 teaspoon cinnamon
- 4 tablespoons of freshly grated ginger
- 1/2 teaspoon ground clove
- 1/2 teaspoon allspice
- 4 eggs, from pasture-raised chickens
- 2 egg yolks, from pasture-raised chickens
- 2 teaspoon finely grated orange rind
- 29 ounces pure pumpkin, pureed
- 2 (12oz) cans evaporated milk
What You Do:
FOR THE FLAKY PASTRY CRUST:
- In a VERY large bowl, combine the flour, sugar, salt and baking powder and blend well.
- With a pastry blender – or 2 butter knives, cut in the cold butter until you have chunks the size of peas.
- In a measuring glass, mix cold water, yogurt and vinegar together. Add liquid, all at once, to the flour mixture.
- Stir quickly to distribute the liquid BUT DO NOT over mix. The consistency of the dough at this point will be a tad crumbly.
- Allow the dough to rest in the fridge for 2 hours or overnight. When the dough is ready it will break and not stretch.
- Divide into three portions and shape into discs. For the ones you won’t be using right now, wrap in wax paper and store in an freezer safe zip lock bag and place in the freezer for up to one month or in the fridge for up to 3 days. If you do freeze it, thaw it in the fridge overnight – do not leave it out on the counter to thaw out.
- When ready to use, roll out to around 12″ diameter so it will fit right in a 9″ pie dish. Transfer dough to the pie dish and trim the edge so it’s hanging over the edge by 1/2″. Fold over the edge and shape as desired. With a fork, prick the bottom and sides of the crust and place in the freezer for 10 minutes.
- To “blind bake” the crust, place a piece of parchment paper in the pie dish, on top of the crust and fill with dry beans so it’s weighted down. Place pie crust on a cookie sheet and bake for 30 minutes at 350F degrees. After 30 minutes, remove the parchment paper and beans and bake for 5 more minutes. Remove from the oven and cool before placing any filling inside.
For Spiced Pumpkin Pie Filling and Topping:
- Preheat oven to 425F degrees.
- Combine all the TOPPING ingredients in a medium size bowl and set aside.
- Combine all the FILLING ingredients in a large bowl and whisk well. Pour this mixture into the cooled down pie crusts.
- Bake pies for 15 minutes. Reduce the oven temp to 350F degrees and bake for an additional 30 minutes.
- Remove from the oven and sprinkle the topping on both pies. Return to the oven and bake for 15 minutes or until a knife inserted in the center of the pie comes out clean. If you find the edges begin to burn while finishing the bake time, place foil over the edges to during those last 15 minutes of baking.
SUBSTITUTIONS:
- White spelt flour: whole white wheat, whole wheat pastry, unbleached & unenriched white flour
- Cane sugar: coconut sugar, palm sugar
- Full-fat plain yogurt: full-fat sour cream, crème fraiche
- Brown sugar: coconut sugar or cane sugar with 2 tablespoons of molasses added
- Freshly grated ginger: use 1 teaspoon ground ginger if you can’t get fresh ginger
HEALTH MADE EASY:
if using canned pumpkin puree, choose organic | make your own puree using “pie pumpkins”, which is a pretty simple process | since it makes 3 pies, you can either bless someone else with one or freeze them for up to a couple months | the fresh ginger really makes a difference in the taste, I prefer fresh over ground
What is your favorite autumn recipe that makes you smile from ear to ear?
The post Spiced Pumpkin Pie with Flaky Pastry Crust appeared first on Day2Day Joys.
]]>The post Tropical Delight Smoothie appeared first on Day2Day Joys.
]]>
Tropical Delight Smoothie
What you need:
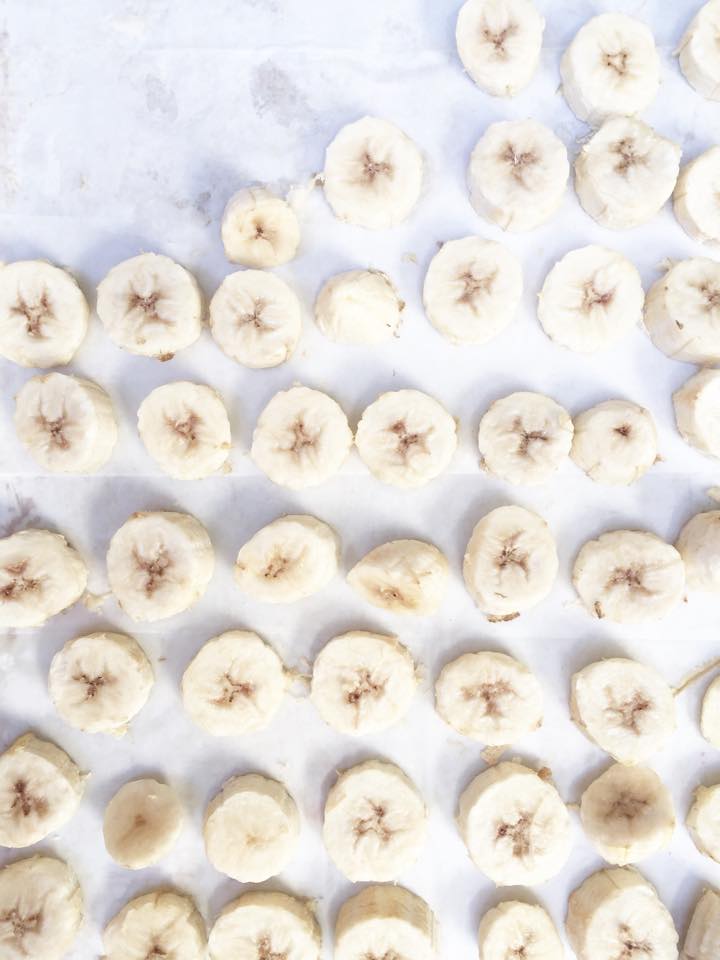
1 banana, sliced (either fresh or frozen)
1/2 cup pineapple, fresh or frozen
1/2 cup ice (this is optional and typically used when the fruit you are using isn’t frozen, if you are using frozen fruit, it usually is plenty cold and you won’t need the ice)
What to do:
What is your family’s favorite smoothie?
The post Tropical Delight Smoothie appeared first on Day2Day Joys.
]]>The post Raisin, Date, & Walnut Muffins appeared first on Day2Day Joys.
]]>The New Year is almost here!
For many, that means resolutions and goals and hopefully a large dose of healthy optimism.
My head is full of plans and ideas, mostly centered on getting us back to a normal routine and menu plan after a couple of months full of festivities and party foods.
How about you? Thinking of your own resolutions?
Maybe you’re resolved to eat healthier, whole foods? Or less sugar? Resolved to start your day right with a nutritious breakfast?
After all the cookies I have eaten this month, all of those resolutions will be reappearing on my list. For my family, eating a great breakfast is of utmost importance. We usually start our day with eggs, yogurt, smoothies, or freshly baked muffins. (Some days, we start with all of these!)
These raisin, date and walnut muffins were inspired by my husband’s favorite oatmeal combination. They are simply sweetened with a small amount of maple syrup as well as the natural sweetness of the raisins and dates. For additional nutrition, you can use whole wheat flour.
Bake up a batch to bring in the New Year and start the year on a healthy and delicious note!
Happy New Year’s!


- 2 C flour
- 1 C old fashioned oats
- 1 Tbsp baking powder
- 1 tsp cinnamon
- 1/2 tsp salt
- 1/2 tsp baking soda
- 1 C milk
- 1/4 C maple syrup
- 1 egg, lightly beaten
- 1/2 C coconut oil, melted
- 1/2 C chopped walnuts
- 1/2 C raisins
- 1/2 C chopped dates
- Preheat the oven to 375 degrees.
- In a medium-size mixing bowl, combine the dry ingredients (flour through baking soda). Whisk together to combine. In a large measuring cup or small mixing bowl, stir together the milk, maple syrup, egg, and coconut oil. Pour the wet ingredients into the dry ingredients and stir until just combined and no streaks of flour remain. Add in walnuts, raisins, and dates and stir.
- Grease a muffin pan and evenly distribute the batter into the twelve wells. (Optional) Sprinkle the tops of the muffins with brown sugar.
- Bake in preheated oven for approximately 15-20 minutes or until the tops are browned and spring back when lightly pressed.
- Let the muffins cool in the pan for 5 minutes before trying to remove them. Transfer to a wire rack to continue to cool. (Or, better yet, throw on some butter and eat them warm!)
What is one of your resolutions for 2015?
The post Raisin, Date, & Walnut Muffins appeared first on Day2Day Joys.
]]>The post Chicken Tortilla Soup With A Kick appeared first on Day2Day Joys.
]]>
Written by Kari @ Living Strong, Health & Wellness, Contributing Writer
It is October and it’s officially cooling down enough to try this great recipe, which is perfect for any chilly weather you might experience over these next few months!
This belly warming soup is simple, quick and so delicious! All you need is a blender and a stock pot (or slow-cooker) and you’re set to make the most amazing tortilla soup you have ever had! You can keep this a mild meal or add some extra peppers to give it that kick that keeps you coming back for more!
This is not only a favorite in our house, but in houses all over these wonderful states! I’ve shared this recipe over the years and then it was included in my cookbook – and it gets rave reviews every time! I have never found a restaurant that has a soup that compares to this! You definitely need to try it! I’ve taken the text from the cookbook to include allergen-free information as well as more tips to make it even healthier!
Chicken Tortilla Soup With A Kick:
What you need:
- 1 whole fryer chicken
- 8 cups chicken broth (can make while cooking the chicken)
- 16 ounces of diced tomatoes
- 1 medium yellow or white onion, cut in half
- 2 cloves garlic – ½ cup fresh cilantro
- 1 teaspoon raw honey
- 3 chipotle peppers soaked in adobe sauce
- optional, 2 avocados
- optional, ½ cup full-fat yogurt, plain
- optional, tortilla chips
- optional, shredded cheese
What you do:
- To prepare the stock and the chicken, plan to start preparing the meal in the morning.
- Cook the whole fryer by placing in a slow cooker, covering completely with water, adding seasonings and spices (salt, garlic powder, parsley, pepper) and cook on low for 8 hours.
- After 8 hours, remove the whole fryer from the slow-cooker using slotted spoons. Place in a bowl and allow to cool for about 5-10 minutes. Begin removing the chicken from the bones and place on a plate. Pull the meat with two forks. This is your shredded chicken.
- Strain out the liquid in the slow-cooker into a bowl (if you’ll cook the soup in the slow-cooker) or stock pot (if cooking soup on the stove) to remove any large pieces of meat or bone that fell off the chicken (it gets super tender). If you used a bowl, once it’s strained, replace liquid back in slow-cooker.
- Separate about 1 ½ to 2 pounds of shredded chicken and add to the broth.
- In a blender, puree the tomatoes, onion, garlic, cilantro and honey until smooth.
- Pour this mixture in with the broth and chicken. Stir to combine.
- Add the chipotle peppers if you are wanting that kick to your soup. If not, omit.
- Continue cooking in the slow-cooker for about an hour and a half or on the stove-top over medium for 45 minutes.
- To serve, prepare the bowls by putting some avocado and yogurt in the bottom of the bowl. Crunch tortilla chips and place on top. Next, ladle the soup over the prepared bowls and top with shredded cheese. Wow, get ready!
Yield: Approximately 14 cups
I’m special because (if using “optional” ingredients, the allergy-free info below may change):
dairy-free, egg-free, gluten-free, grain-free, soy-free
Substitutions:
*Full-fat yogurt: full-fat sour cream
Health Made Easy:
if you’re short on time, you can purchase your broth, but make sure it’s organic and low-sodium | homemade broth will supply your body with so many nutrients that you’ll never get out of store bought brands, so choose homemade if possible | don’t have time to cook a whole fryer, purchase chicken thighs, bake and shred | use fire-roasted tomatoes or seasoned diced tomatoes | you don’t need to put all the optional extras in the bowl first, but boy does it sure taste good that way | store leftovers in glass mason jars in the fridge | if you use the chipotle peppers the soup will get spicier over a couple days | choose non-gmo tortilla chips
Enjoy! Enjoy! Enjoy!
What is your favorite soup to keep you warm during the autumn and winter seasons?
The post Chicken Tortilla Soup With A Kick appeared first on Day2Day Joys.
]]>The post Immune Strengthening Herbal Tea Blend appeared first on Day2Day Joys.
]]>
Written by Contributing Writer, Kari @ Living Strong Wellness
Now that summer break is winding down and kids are heading back to school – we need to start becoming more proactive with our children’s health.
Don’t get me wrong, we should be proactive year round, but during the summer we’re outside more getting fresh air, we’re getting loaded with Vitamin D, getting more sleep and getting more exercise. With school back in session, our children are sitting in air conditioned schools, windows closed, anti-bacterial soap flowing down the halls, little outside time, little exercise and lots of germs.
Germs…
That one word freaks a lot of people out. This is why anti-bacterial soap is a multi-million dollar business. Think about it, though…if it really worked, why are schools filled with scores of sick kids and teachers all the time? I’m not an advocate of this ‘miracle’ germ cure. Not only does it kill bad bacteria – but it kills good bacteria as well, making you and your children more susceptible to germs, viruses and infections.
I’m also not a fan of the toxic ingredient, Triclosan, in the majority of these anti-bacterial soaps. Good ole hand soap and water works just fine. In fact, my son and daughter opt out of using anti-bacterial soap at school. They have been informed the past 4 years that they are to only use soap and water. They literally stand at the door as kids come in from recess and squirt that dangerous and hormone disrupting junk on the students hands. Not good.
It’s not bad hygiene that’s an issue (although it may contribute to some children’s constant sickness). It’s the internal health of the person. This is what will determine if sickness occurs or not.
Plain and simple: we need to boost the immune systems of our children and ourselves as we get back into the school routine.
We will all be surrounded by more germs, viruses and infections and our bodies will need the extra boost to keep the immune system strong and ready to fight any foreign invaders that enter the body!
There are many ways we can aid our immune system in remaining strong throughout the year, especially the school year and winter season. I don’t know about you, but I would much rather be proactive, daily taking care of my body and my child’s body to keep sickness from taking root, than having to do all I can to bring health back where sickness came in and took over.
This recipe is easy, quick and yields approximately 12 full strength servings (adults) and 24 half strength/diluted servings (children). I am fortunate to be able to purchase all these herbs in bulk at our local Vitamin Cottage/Natural Grocers. If you are not able to purchase these locally, you can purchase them online at places such as Bulk Herb Store and Mountain Rose Herbs! If you aren’t into making teas yourself and don’t want to order bulk herbs – you can also order the herbal tea blend from my Etsy shop – Glowing Mama. Each bag contains 12 adult servings or 24 youth servings. Each serving is 1 tablespoon of the herbal tea blend to 8 ounces of water.
It’s a great addition to your daily routine to help keep the immune system strong and functioning at optimum levels! This blend can be served hot or iced. It is always best to get organically grown herbs when buying in bulk, but if it’s not possible, get what is available to you. When ordering from Mountain Rose Herbs, you will be getting high quality, organic dried herbs that you can use safely and without worry of toxins. The other option is to grow what you can as well! That’s always an added plus and you know exactly how it is grown from seed to completion.
Kari’s Immune Strengthening Herbal Tea Blend
Here’s What You’ll Need:
- 3 tablespoons dried Elderberries
- 3 tablespoons dried Rosehips
- 3 tablespoons dried Peppermint (use in adult blends) or 3 tablespoons dried Catnip (for children blends)
- 4 teaspoons dried Lavender
- 2 teaspoons dried Sage
- 2 teaspoons dried Hibiscus
- 1 teaspoon dried cut Ginger
- 1/2 teaspoon dried Thyme
Here’s What You’ll Do:
- Thoroughly combine all herbs in a large jar or large bowl.
- Store in a sealed container (glass is best), but a sealed bag or other container will work.
- Keep in a dark, cool place – such as the pantry.
- To use, in a glass jar steep 1 tablespoon of herbal blend in 8 ounces of boiling, filtered water. For a tea, steep for anywhere from 3-8 minutes. For a stronger more potent beverage, you can make an infusion by steeping for around 20-30 minutes. You can place loose herbs in a muslin tea bag, tea ball or leave them loose in the jar.
- When steeping is done, remove bag, ball or strain the herbs using a find mesh strainer.
- Add RAW honey to sweeten and enjoy! ***
*** Adults can drink this directly after steeping. If making for children 12 and under, fill cup half way with tea/infusion, then add RAW honey, then add water to fill the rest of the cup.
What do you add to your daily routine to help keep your immune system strong and thriving?
The post Immune Strengthening Herbal Tea Blend appeared first on Day2Day Joys.
]]>The post Jazz Up Your Summer BBQ Menu With Real Food Recipes appeared first on Day2Day Joys.
]]>
Written by Kari @ Living Strong, Health and Wellness, Contributing Writer
With summer in full swing and the Fourth of July right around the corner, we all know that this means a lot of picnics, bbq’s and get togethers are on the calendar. This also means that this will involve a lot of, you guessed it, food!
Is it possible to eat healthy during all these summer festivities? Yes, yes and yes! Eating healthy doesn’t mean that these celebrations have to be boring! In fact, I believe that you can have even better tasting food when you choose real foods prepared properly and with love! Nothing off the grocery store shelf can hold a candle to the greatness of real food!
A couple months ago I released my first cookbook that addresses the reality and simplicity of delicious and healthy food! On my journey to live a healthier lifestyle, I was finding that eating healthy usually meant bland, boring and just plain not good! My family felt the same! I knew that real food could taste amazing, be nourishing and keep you satisfied, so I went to work creating, experimenting and indulging.
Below are two wonderful recipes that can be found in my cookbook that you can incorporate into your summer celebrations! Kari’s Restaurant Style Salsa – to go with those big bowls of tortilla chips and Easy Peasy Peanut Butter Drops for a protein packed sweet treat. I know you will enjoy these real food treats and feel good knowing that you are feeding your family foods that will not harm them.
What You’ll Need:
- 1 can (28 ounce) whole tomatoes, with juice (I use Muir Glen Organic Fire Roasted Tomatoes
)
- 1 can (28 ounce) diced tomatoes with green chilies
- 1/4 cup yellow onion, chopped
- 2 to 3 cloves of garlic
- 1 teaspoon, unrefined sugar (cane, sucanat, coconut) or honey
- 1/2 teaspoon sea salt
- 1/2 teaspoon ground cumin
- 1 cup fresh cilantro
- 2 to 3 tablespoons lime juice (from the actual lime is best, if they aren’t in season, use lime juice)
- 2 small cans diced chilies (hot if you like the zing, otherwise use mild)
- 1 tablespoon diced jalapenos (add these very last to make the salsa more hot) (optional)
- 1/2 to 1 smoked chili pepper (optional – these add zing too)
What You’ll Do:
- Pour one can of the tomatoes in the blender, add the onion, garlic, sugar, sea salt and cumin.
- Blend until smooth.
- Pour this into a large mixing bowl.
- Now, pour the other can of tomatoes in the blender and add the cilantro, lime juice, diced chilies and jalapenos.
- Blend until smooth.
- Add this into the bowl with the other half of the salsa.
- Mix well with a bamboo spoon until combined thoroughly.
- Now it’s taste testing time. Grab some chips and and test it out. Does it need more heat? Add the smoked chili pepper. A little more cumin? Lime juice? This is your time to get creative and create a taste that you and your whole family will love.
- If you need to add more ingredients, scoop a couple cups of salsa back into the blender, add the extra ingredients, blend and pour back into the bowl. Mix again and test again.
- Store in glass jars – this typically makes 2 quarts of salsa.
- Refrigerate. Over the course of a couple days, the flavors will have time to mesh together and you’ll get a wonderful, amazing and fresh salsa!
Easy Peasy Peanut Butter Drops
(Packed with Protein and Energy)
What You’ll Need:
- 1/2 cup natural peanut butter (or another nut butter of choice)
- 1/2 cup raw honey
- 1/2-1 cup unsweetened, finely shredded coconut
- 1/4 –1/3 cup mini dark chocolate chips
- Sucanat (unrefined sugar) for rolling the drops
What You’ll Do:
- In a medium size bowl, mix the peanut butter and honey until combined thoroughly.
- Add the chocolate chips. You can add more or less according to your taste (I always add the larger amount).
- Add the coconut in 1/4 cup amounts until the consistency reaches a thick, yet semi-sticky state.
- You don’t want it so sticky that you can’t roll it, but you don’t want it so dry that it wont hold together. Find the happy medium.
- Once you are able to roll them and they still have some stickiness to them, roll into balls and then roll in the sucanat.
- Place on wax or parchment paper on a baking sheet or plate.
- Refrigerate for a while so they can harden up a bit, transfer to a glass jar and keep in the fridge.
I hope you have a wonderful and amazing summer, making time to enjoy family, friends and delicious food. Take time to cherish these moments and be thankful for the many blessings that God has poured out upon our lives!
**note from Rachel: Make sure you check out Kari’s new cookbook Real Food. Real Kitchen. So Good.: Health Made Easy. It’s actually on sale on amazon right now!

What is your favorite summer dish that brings a smile to your face and everyone who tries it?
The post Jazz Up Your Summer BBQ Menu With Real Food Recipes appeared first on Day2Day Joys.
]]>The post All Natural Egg Dyes {Plus a Paint Recipe} appeared first on Day2Day Joys.
]]>
Written by Contributing Writer, Kelly @ Eyes On The Source
Egg dyeing kits are a very fun and popular purchase this time of year, but how simple it is to make your own dyes using natural spices, teas, fruits and vegetables! You can create beautiful egg displays experimenting with these natural dyes. Plus, you don’t have to worry about what ingredients are in store bought kits.

These are some general recipes to try. Add more or less water/vinegar to vary the colors. So many possibilities!
The easiest way I have found to hard-boil eggs without over cooking them is this:
Add eggs to a pot with enough cool water to cover them and a splash (about a Tbsp or so) of vinegar. Vinegar helps to clean the eggshells and aids in absorption of color. Bring to a boil for 1 minute. Cover, remove from heat and let sit for 15-20 minutes. Remove with a slotted spoon and place into a bowl of ice water to cool.


To make natural colorful dyes:
Blue/Purple
Blueberries, Purple Cabbage
Boil 2 Cups of water with 1/2 cup of blueberries or 1/2 head of purple cabbage. Add a splash of vinegar. Simmer for 20 minutes. Cool and then soak eggs until desired color.
Yellow/Orange
Turmeric, Onion Skins
Boil 2 cups of water with 3 Tbsp of turmeric or skins from 3 onions. Add a splash of vinegar. Simmer for 20 minutes. Strain onion skins. Cool and then soak eggs until desired color.
Red/Pink
Red teas, cherries, paprika, beets
Boil 2 cups of water with 2-4 tea bags, 3/4 cup cherries, 3 Tbsp paprika or 3 medium chopped beets. Add a splash of vinegar. Simmer for 20 minutes. Strain and cool. Soak eggs until desired color.
Brown/Tan
Coffee, Tea
Brew 2 cups of strong tea or coffee. Cool and soak eggs.
Soak in two or more colors to vary the results. Another idea is to add the color while you hard boil the eggs if you want to make several small batches.


When you have finished dying the eggs, you can use the leftover dyes to make natural paints (or paint the eggs)!
Natural Paints:
- 2 Tbsp natural dye (from above recipes)
- 2 Tbsp flour
- 1 Tbsp liquid dish soap
Have you tried other egg dying techniques? What has worked well for you?
The post All Natural Egg Dyes {Plus a Paint Recipe} appeared first on Day2Day Joys.
]]>The post Organized Meal Planning Made Simple appeared first on Day2Day Joys.
]]>
Written by Kari, Contributing Writer
Meal planning has never been one of my favorite activities. I remember when I got married almost 13 years ago the dread I faced every time I went to the grocery store. I never had a plan, I never knew what to get and I had no creativity. My husband was a trooper, because I sure didn’t woo him with my amazing skills in the kitchen. As time went on, I moved from the same ole repeated 5 meals to a broader menu, but I still despised the duty of planning meals and grocery shopping. My solution? Continue to skip the planning and complain every time I went shopping. Wrong solution.
Over the years I have developed a whole new perspective on this task and I have found that I can do it joyfully.
First and foremost, in the Bible, we are told to:
“Whatever you do, work at it with all your heart, as working for the Lord, not for human masters,”~Colossians 3:23, NIV
This would include feeding and taking care of my family. After all, if I grumble and complain about this task, it won’t be much of a blessing to my husband or kids. They will see that taking care of them is a burden for me and it won’t be enjoyable. Also, what example is that for my kids? Not a good one, that’s for sure.
Back in 2008 I began the process of becoming a Certified Health and Nutrition Consultant, which has been a huge part in changing my perspective in this area. A couple certifications I hold are for Fitness Nutrition and as a Personal Fitness Chef. You bet I look at meal planning and feeding my family differently. It’s no longer a dreaded task nor a burden to me. It’s an honor to be able to take such good care of my family as I sow time into their lives by preparing healthy and nutritious meals.
I’ll have to be honest though – at first, I still struggled with grocery shopping, planning and preparation. I always forgot to take something out of the freezer or I forgot the ingredients to make a side dish and I would find myself getting frustrated and resorting to convenience rather than nutritious. It occurred to me one day that I absolutely had to implement something I had operating in every other area of my life except meal time: ORGANIZATION and a PLAN!
That’s just what I did and in the matter of a week or two, I had a simple, yet extremely effective meal planning binder and system set up that worked for ME. This ONE change has saved me time, money and sanity over the past three years.
It’s not complicated, nor is it unrealistic. It keeps my most frequently used recipes in one place, I have my preparation details for the week right in front of me and I’m able to keep all my menu plans stored here so I can go back and get ideas when I’m feeling uncreative. How to make this SIMPLE and EFFECTIVE meal planning binder:
-
– I took a 1” binder (can be larger if you want) and put dividers in it.
-
– I named each section for what was most pertinent for me and my family (Menu, Main Dish, Sides/Appetizers, Dessert, Drinks)
-
– I made up a weekly menu plan and weekly preparation form to be my go-to on a daily basis.
-
– I have a month calendar so I can put all the dinners on it and I can see a broader view of what the month’s meals look like.
How to use this binder and allow it to make meal planning PRODUCTIVE.
-
– Every week I take some time to plan my meals for the following week.
-
– I’ll fill out the menu sheet, then I’ll fill out my prep/details sheet so I know what I have to do on a daily basis (take beef out of freezer, soak pecans, make crème fraiche). This is a life-saver.
-
– Then I go through the menu and make my shopping list. This is where I saved so much money! Buying stuff I didn’t need, then having to go back and spend more money to buy what I did need.
-
– LOOK at this sheet everyday to make sure you don’t forget anything. If you need it “out” so you’ll remember to look at it, hang it on your fridge so it’s in front of your eyes all the time.
-
– Store your most used recipes in their sections. This way you’re not searching all over for the “last place you saw it”.
-
– Make notes on your meals and recipes. This way you’ll know how often you should or shouldn’t prepare it. Notes such as: “Excellent!” or “Hubby loved it, kids didn’t”. Also note any alterations you made to the recipe and whether it worked or not!
-
– Keep your menu plans so you can refer to them later.
It may take a couple weeks to get in the swing of things and remembering you have this wonderful tool, but once you get in the routine of this – your meal planning and shopping will be so much easier.
Now, to wrap this up I’ll share with you one of my go-to autumn recipes that has it’s place in my binder. It is my quick and easy Cinnamon Roll Smash. This is a great, healthy alternative to those store bought cinnamon rolls or ones made with pre-made pastry dough.
Cinnamon Roll Smash:
What You Need:
Almond Flour Crust
– 2 cups almond flour
– 1/2 cup coconut sugar (you could also use organic cane sugar)
– 2 tablespoons whole milk or heavy cream (use coconut cream for dairy-free option)
– 1 tablespoon real butter, melted (via stovetop is best, you could also use raw coconut oil)
– 1 tablespoon vanilla – make your own
– 2 teaspoon baking powder – aluminum free
– 1/4 teaspoon kosher sea saltFilling
– 1 cup toasted almonds, toasted pecans or toasted walnuts
– 1/2 cup real butter, melted (can use coconut oil)
– 1/2 cup coconut sugar
– 1/4 cup sucanat (or brown sugar)
– 2 tablespoons grade B maple syrup
– 1 tablespoon vanilla – make your own
– 2 teaspoons cinnamon
– 1/2 teaspoon kosher sea salt
– 1/8 teaspoon ground cloves (optional)
What to Do:
To get complete instructions on how to make these amazing treats, visit Cinnamon Roll Smash and make them as soon as possible! Your family will thank you for it! Now, enjoy the simplicity of meal planning which will make your routine easier, your wallet fuller and will leave you more time in the kitchen to make amazing snacks like these!
Enjoy! And don’t forget: Everyday make your life A LIFE WORTH LIVING!
*this post may be linked to: Encourage One Another, Titus 2sdays, and WFMW*
How do you simplify meal planning? Do you have a system?
The post Organized Meal Planning Made Simple appeared first on Day2Day Joys.
]]>
