The post All Things Pumpkin Ideas appeared first on Day2Day Joys.
]]>There is just something about this time of year that brings out that southern greeting. It’s Fall Y’all and that means pumpkins, pumpkins, pumpkins!
Pumpkin Pie Spice
to get the recipe click here!
*the 2 ideas below originally posted 5 years ago in this post*
Pumpkin Pie Smoothie
This recipe is so very simple! All you need are a few ingredients and a great blender and your set!
What you need:
1/3+ tsp harvest pumpkin spice, depending on your taste
1/2 tsp vanilla extract
1/2 cup frozen pumpkin (cubes from silicone tray)
1/2 cup unsweetened almond milk
1-3 Tbsp honey (or sweetener of your choice)
1/2 scoop vanilla protein powder *optional*
Handful of Ice cubesWhat to Do:
*Add all ingredients into a blender, except protein powder.
*Blend together until desired consistency, add more milk or water as needed.
*Once you have your desired consistency, add in protein powder but only blend until mixed (about 10 seconds or less). If you overdo it, the protein powder will make the smoothie too frothy.
*Enjoy your pumpkin smoothie! Yum!
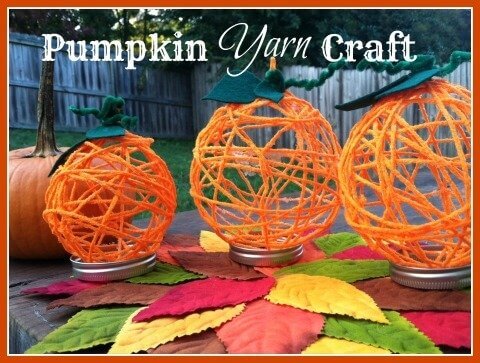
Pumpkin Yarn Craft
What you need:
orange yarn
a couple balloons
multi-purpose glue (like elmer’s or make your own paste with flour and water)
1/4 C water
green pipe cleaners + green felt
scissors
small bowl
plenty of paper towels
What to do:
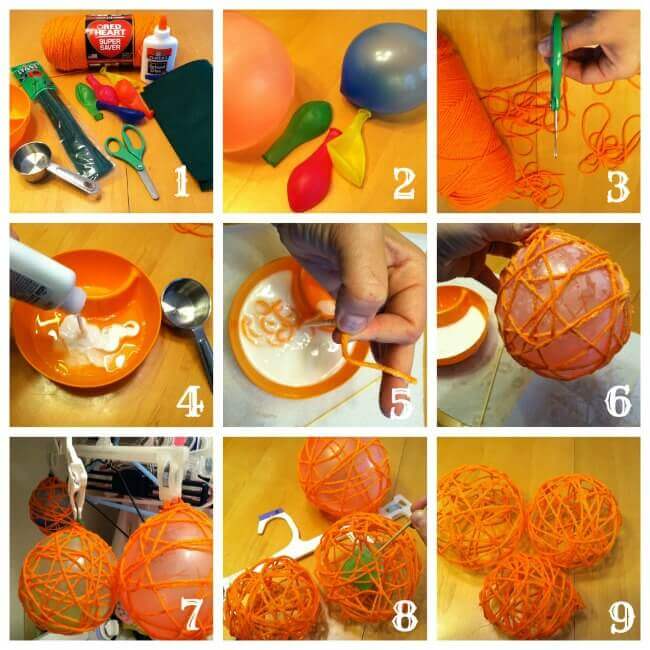
To make this fun with as little mess as possible (this IS a messy craft), follow these simple steps.
- Gather supplies, decide number of yarn pumpkins you’ll be making
- Blow up your balloons and tie a knot
- Cut yarn in 2-4 feet strips depending on your balloons sizes, set aside (3-5 strips per ballon)
- In a cereal bowl make glue paste using the whole bottle of glue, and 1/4 C water, mix well, set aside
- Dip your yarn into the glue paste, then lightly slide yarn through 2 fingers dripping access glue off
- Wrap yarn around pumpkin, overlapping pieces of yarn to make it sturdy
- Once all yarn is wrapped around balloon, hang dry or set on a jar for 1-2 days
- Once dry, pop balloon and pull thru an opening
- Use the pipe cleaners & felt to make a stem, twirly vines, leaves
Display for all to see, your kids will love their crafty pumpkins!
These 3 ideas are shared in the video below:
And here are more pumpkin ideas found on this blog:
- Spiced Pumpkin Pie
- Gluten-Free Pumpkin Muffins
- Cream Cheese filled Pumpkin Muffins
- Redeeming Halloween
ps. Im curious, if you are a reader here, would you like to see more posts? I have been almost exclusively posting on youtube because this blog lacked interaction and comments but if you all are reading and commenting, I would try more to post here!
-Rachel
The post All Things Pumpkin Ideas appeared first on Day2Day Joys.
]]>The post Tips For Eating Healthy During The Holidays appeared first on Day2Day Joys.
]]>
Written by Kari @ Kari Newsom Contributing Writer
It’s that time of year again.
As a Health and Nutrition Coach, I always have people ask me for some tips on how to successfully celebrate special occasions without completely going off the deep end when it comes time to eat.
The first and most important thing I always tell people is this:
ENJOY THE CELEBRATION!!!
All to often we try so hard to do ‘the right thing’ about the whole ‘eating during the holiday’ issue, that we actually end up NOT enjoying this time of year.
Don’t do that anymore. Eating healthy and making healthier choices isn’t about being miserable. I promise.
There are a couple pointers I like to give people who don’t want to go crazy, over indulge and completely get off track with their healthy lifestyle.
If you are like the average person, this time of year {or any celebration for that matter} can be a challenging time.
My family typically eats extremely healthy, BUT I don’t freak out and go crazy that I’m not getting my organic and fresh foods. I am always thankful that someone would take the time to prepare a meal for us to enjoy – whether it’s considered ‘healthy’ in my book or not. Since 98% of the time we eat extremely healthy and disciplined at home, I never feel guilty when those occasions arise where we aren’t able to eat that way.
If there are certain foods that you absolutely cannot eat (if you have allergies or have celiac, etc.) then speak with the host for that day and explain your situation and ask if it would be okay if you brought some of your own items so you can still sit down and enjoy the meal with everyone else. Many times you will find that the host may offer to make some dishes according to your needs. If your eating preferences are just that, preferences, then it’s up to you to make smart choices while you are filling your plate.
Here are a few tips that might help you out this Thanksgiving holiday:
1. Eat a Smaller Meal Beforehand
If you are prone to eating TONS of food and filling your plate to overflowing, then going back for seconds and thirds – try eating a small meal before you go to your Thanksgiving celebration. It doesn’t have to be a rich meal, just a small meal that will help fill you up enough where gorging out on food doesn’t look so appealing to you! You’ll still get to enjoy the food on the table, you just won’t be shoveling it all in your mouth like there’s no tomorrow.
2. Water
Drinking a glass of water about 30 minutes before sitting down to eat can make a person feel full, so you won’t end up eating as much.
3. Self-Control
Make a decision to only have one plate of food, which means smaller portions of each item. Not always easy, but your stomach will thank you for it once dessert time rolls around.
4. Mini Size It
If you are a dessert sampler like some {GUILTY], then don’t take full size servings of each dessert. Cut in half, thirds or quarters so you can sample all the wonderful goodies, without consuming the amount of an entire pie or cake by the time you’re done.
5. Control Your Eyes
If your eyes are always bigger than your stomach, then it’s about discipline, discipline, discipline! Just CONTROL yourself when filling your plate!!! Yes, it smells so good and looks amazing and Aunt Susie’s mashed potatoes are the bomb, but you don’t need a mountain of food to enjoy all that goodness.
Studies show that the first couple bites of food are the most intense and satisfying – taste wise. Even with amazing desserts, the more bites you take, the magnitude of it’s greatness starts to taper down a bit after the first few bites.
6. Going Back
Are seconds bad? I don’t think so, as long as your first servings weren’t gi-normous to begin with. Just remember that you don’t need to over do it! When your body tells you to stop eating – then STOP EATING!
7. Enjoy The Company
Make a conscious effort to enjoy the people around you. Aren’t we all gathering on Thanksgiving (or whatever celebration) to spend time with each other? Yes, so enjoy your company, engage in conversation, laugh and CHEW SLOWLY. This is a guarantee that you won’t eat as much when you talk with people and give your food a chance to settle and your brain is told that you’re full (this usually takes about 15-20 minutes to occur.)
8. Chew Chew Chew
Along with chewing slowly, we should all chew each bite 20-30 times before swallowing completely! I know you think I sound crazy, but you will reduce the amount of food you eat by quite a bit. Why? Since you’re taking the time to chew your food purposely, you won’t be gulping down large portions every 5 seconds and by the time you’ve been eating for 15-20 minutes and your body is saying ‘STOP, I’M FULL’ – you won’t have consumed nearly as much food. Also, chewing this many times is the most important part of digestions since it breaks down your food to a point that once it hits your stomach, your stomach won’t need to work so hard to continue the digestion process.
9. Nix Tons of Liquids While Eating
Try not to drink a ton of liquid while you are eating. The reason is because it dilutes your digestive juices in your stomach and then it takes so much longer for your body to digest your food. This can lead to you feeling so full that you feel sick to your stomach. Give your food a chance to do its job once its in your body!
All in all, we need to demonstrate self control and we are more than capable of doing that! Take time to enjoy the food that has been prepared for you and enjoy the people surrounding you. These holidays have a purpose behind them, so focus on those purposes instead of making the food the center and most important aspect of the day.
Most importantly, when it comes to the food you eat, pray over your food and thank God for the nourishment to your bodies and protecting you from any harm. Thank Him for the family and friends that are surrounding you and the many blessings you have in your life. Thank Him for the life you have. If you are reading this, then you are alive! What a wonderful thing. On top of that, you can’t be reading this post without a computer, ipad or smart phone! Be thankful! You are blessed! Now, be a blessing to others!
What simple things do you do during holiday celebrations to avoid over-indulging?
The post Tips For Eating Healthy During The Holidays appeared first on Day2Day Joys.
]]>The post Homemade Apple Cider appeared first on Day2Day Joys.
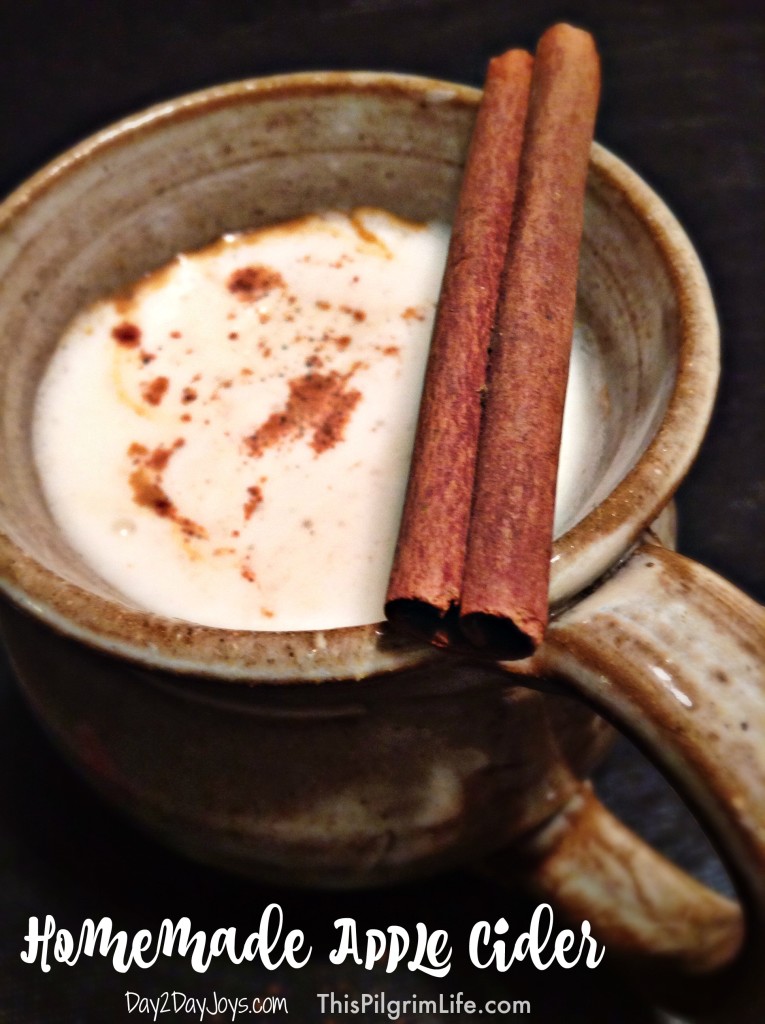
]]>Every fall we do the traditional things like go pick pumpkins, ooh and ahh over the leaves, read books about Johnny Appleseed, and (one of my personal favorites) make homemade apple cider.
Sure, it’s easy enough to simply purchase the glass jugs of cider from the grocery store. And we do that too.
But making cider at home is both easy and fun.
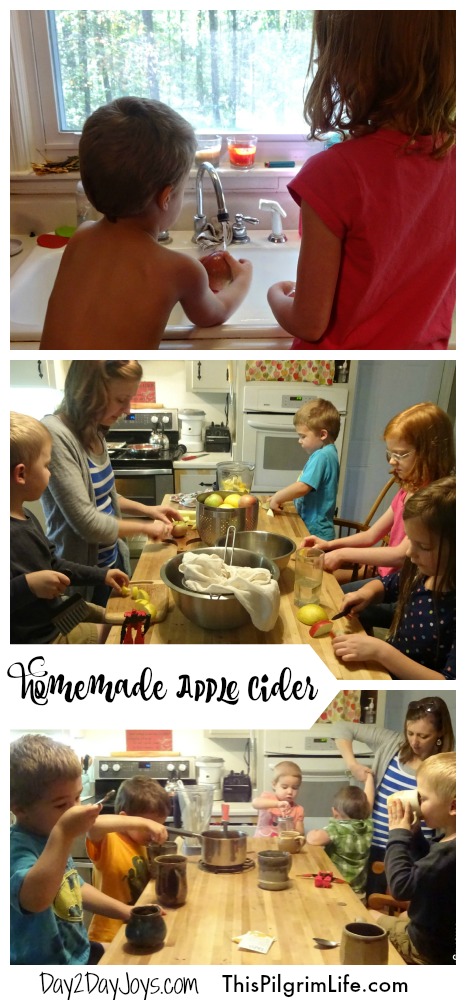
Last week one of my closest friends and her four children joined us for a day, no plans in particular other than catching up and enjoying each other’s company.
We all spent the day playing LEGOS, picnicking in the backyard, introducing friends to our mud kitchen, and gathering around the kitchen island to make apple cider. Oh, and talking all day the way you can only do with a kindred spirit.
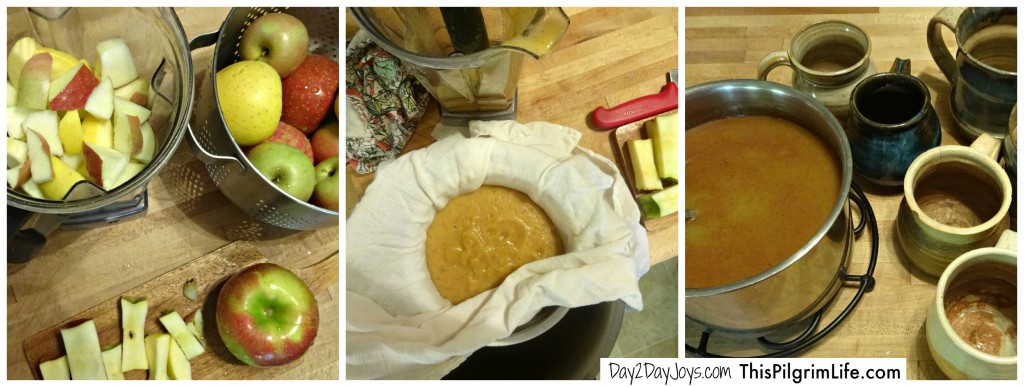
The kids, ages 8 to 3, all pitched in to make the cider. They washed the apples, cut them into small chunks, and put them in the Vitamix. I added a small amount of water and then blended the apples on high for a minute. After straining the blended mixture to separate the juice from the pulp, the cider was done.
We put it to the kids whether they wanted to enjoy the apple cider chilled or warmed. They unanimously agreed– warm with whipped cream.
Traditions are one of my favorite things about the changing of the seasons. With each new season, there are new memories to be made and old memories to recall together. Even better when the traditions taste great and can be shared with friends!
Homemade Apple Cider in 5 Easy Steps
- Wash the apples. Cut into 1-inch chunks and add to high-powered blender. Add about 1/2 cup of water to help blend.
- Blend the apples on high for about 1 minute, or until all the apples are smooth.
- Set a metal strainer over a large bowl. Drape a tea towel over the strainer and pour in the blended apples. Squeeze and twist the tea towel to separate the juice from the pulp. Save the pulp for “applesauce” to use in muffins or oatmeal.
- Enjoy the apple cider warm with spices (cinnamon, nutmeg, etc) and fresh whipped cream. Or drink it chilled.
- Keep extra cider in the refrigerator up to a week.
This month, I am writing all about kids in the kitchen on my blog. Helping to inspire and equip you to create habits of health and hospitality in your kids. You can find all the series posts here.
What food traditions do you have in your family?
The post Homemade Apple Cider appeared first on Day2Day Joys.
]]>The post Five Fun Fall Activities For Children appeared first on Day2Day Joys.
]]>
Written by Courtney @ A + Life, Contributing Writer
It is hard to believe that we are already one month into the fall season and that before long (if not already!) we will be bombarded with all things Christmas related. But, today, I wanted to share about some of our very favorite fall things to do with our daughter, Abigail.
This time of year is perfect for being outside all day long! The crisp autumn air, the bright sun, the sights and sounds of fall, all make for a wonderful outdoor experience. There are SO many fun things that you can do, but here are just a few of our favorites! So, without further ado, I give you:
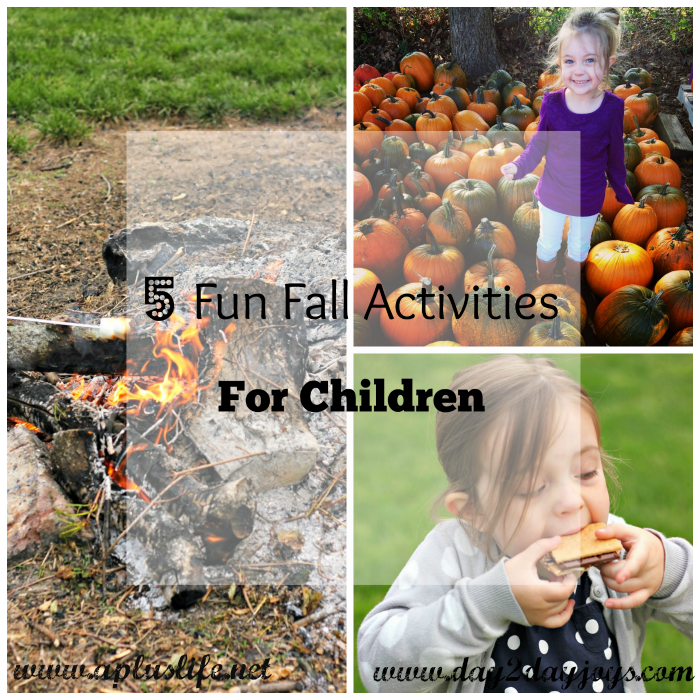
Five Fun Fall Activities For Children
1. Visit A Pumpkin Patch
The one thing we always make sure to do in the fall is to visit our local pumpkin patch! It may be small and quaint, but we love walking around and selecting our pumpkins and mums, taking a small hay ride, capturing a few special moments on our camera, and letting the farmers teach our little girl all about pumpkins.
2. Watch An Outdoor Movie
This has been a new addition to our family fun, but recently my husband, Jim, acquired a small projector to play movies on. We set up a comfy place to sit in the backyard, hang up a big white sheet, and enjoy making our very own drive in of sorts in the back of our house! Projectors are pretty easy to rent and borrow, so I highly suggest getting your hands on one and giving a backyard movie night a try this fall!
3. Backyard Camping
If you’re already in your backyard for a family movie night, why not also set up a tent and have a camp out as well? I’m not much(read: NOT AT ALL) for camping, but if the weather is right and my own personal bathrooms are close, you can get me out there 
4. Play In The Leaves
We aren’t fortunate(or are we? enough to have large trees in our yard capable of being piled up and raked, but Grandma’s house sure does! There isn’t anything more quintessential childhood than running and jumping and burying yourself in a massive pile of leaves.
5. Roast S’mores
And of course, what is fall without a roaring bonfire, toasted marshmallows, and s’mores to enjoy? Getting sticky, sweet, and messy together make some of the most fun memories!
This is my list, but I would love to hear yours! So tell me,
What are some of your favorite fall activities to do with your kids?
The post Five Fun Fall Activities For Children appeared first on Day2Day Joys.
]]>The post Spiced Pumpkin Pie with Flaky Pastry Crust appeared first on Day2Day Joys.
]]>
Written by Kari @ KariNewsom.com, Contributing Writer
Autumn is officially here! At least in Colorado! We are having beautiful and warm days (high 70’s to low 80’s), but the nights are cool and crisp! Leaves are turning bright yellow, orange and red – and the morning has brought a slight haze these past few days.
Typically I am more of a warm-weather person. I’m all about the sun, flip flops and being outside. That being said, I’m still a Colorado girl at heart. I like to get bundled up in chunky sweaters, wool socks and fur lined shoes. I like jumping in the Jeep with my husband and kids, all bundled up, to drive to the mountains to see the Aspen’s turning. And since we’re Colorado natives, no matter what the weather, you roll the windows down, crank the heat and put those hats on and enjoy the drive!
The other thing I like about autumn is that I start spending more time in the kitchen again, making delicious and yummy smelling foods! A few years ago I wanted to make a pumpkin pie – a pie that I’ve never liked. As in ever. I figured it was because store bought pumpkin pies were not close to one made from scratch, so I wanted to try making one COMPLETELY from scratch to see if I could like a real pumpkin pie!
I have to say, when I took the first bite of this from-scratch creation, I instantly became hooked. This is a tad more involved than other recipes – okay, a lot more involved, so make your special occasions more special by incorporating this into the menu. It is absolutely delicious! If you’re already a pumpkin pie lover – then you MUST try this and add it to your favorite’s list! It’s on ours, which is why we included it in my first cookbook – Real Food. Real Kitchen. So Good!

Spiced Pumpkin Pie with
Flaky Pastry Crust
Yield: 2-3 pies
What you need:
*for the flaky pastry crust
- 3 ¾ cups white spelt flour
- 1 tablespoon cane sugar
- 1 1/2 teaspoon sea salt
- 1/2 teaspoon baking powder, aluminum-free
- 1 ¾ cup cold real butter
- 2/3 cups ice cold filtered water
- 2 tablespoons full-fat plain yogurt
- 1 teaspoon white vinegar
*for the spiced pumpkin pie filling and topping
(this will fill at least 2 pie dishes, depending on the size you make – believe me you’ll be glad you have more than one)
- TOPPING
1/2 cup (1 stick) real butter , at room temperature - 1 cup spelt flour
- 2/3 cup packed brown sugar
- 1 cup chopped pecans
- 1 teaspoon cinnamon
- 1 teaspoon vanilla
- FILLING
1 1/2 cups packed dark brown sugar - 1 teaspoon sea salt
- 2 teaspoon cinnamon
- 4 tablespoons of freshly grated ginger
- 1/2 teaspoon ground clove
- 1/2 teaspoon allspice
- 4 eggs, from pasture-raised chickens
- 2 egg yolks, from pasture-raised chickens
- 2 teaspoon finely grated orange rind
- 29 ounces pure pumpkin, pureed
- 2 (12oz) cans evaporated milk
What You Do:
FOR THE FLAKY PASTRY CRUST:
- In a VERY large bowl, combine the flour, sugar, salt and baking powder and blend well.
- With a pastry blender – or 2 butter knives, cut in the cold butter until you have chunks the size of peas.
- In a measuring glass, mix cold water, yogurt and vinegar together. Add liquid, all at once, to the flour mixture.
- Stir quickly to distribute the liquid BUT DO NOT over mix. The consistency of the dough at this point will be a tad crumbly.
- Allow the dough to rest in the fridge for 2 hours or overnight. When the dough is ready it will break and not stretch.
- Divide into three portions and shape into discs. For the ones you won’t be using right now, wrap in wax paper and store in an freezer safe zip lock bag and place in the freezer for up to one month or in the fridge for up to 3 days. If you do freeze it, thaw it in the fridge overnight – do not leave it out on the counter to thaw out.
- When ready to use, roll out to around 12″ diameter so it will fit right in a 9″ pie dish. Transfer dough to the pie dish and trim the edge so it’s hanging over the edge by 1/2″. Fold over the edge and shape as desired. With a fork, prick the bottom and sides of the crust and place in the freezer for 10 minutes.
- To “blind bake” the crust, place a piece of parchment paper in the pie dish, on top of the crust and fill with dry beans so it’s weighted down. Place pie crust on a cookie sheet and bake for 30 minutes at 350F degrees. After 30 minutes, remove the parchment paper and beans and bake for 5 more minutes. Remove from the oven and cool before placing any filling inside.
For Spiced Pumpkin Pie Filling and Topping:
- Preheat oven to 425F degrees.
- Combine all the TOPPING ingredients in a medium size bowl and set aside.
- Combine all the FILLING ingredients in a large bowl and whisk well. Pour this mixture into the cooled down pie crusts.
- Bake pies for 15 minutes. Reduce the oven temp to 350F degrees and bake for an additional 30 minutes.
- Remove from the oven and sprinkle the topping on both pies. Return to the oven and bake for 15 minutes or until a knife inserted in the center of the pie comes out clean. If you find the edges begin to burn while finishing the bake time, place foil over the edges to during those last 15 minutes of baking.
SUBSTITUTIONS:
- White spelt flour: whole white wheat, whole wheat pastry, unbleached & unenriched white flour
- Cane sugar: coconut sugar, palm sugar
- Full-fat plain yogurt: full-fat sour cream, crème fraiche
- Brown sugar: coconut sugar or cane sugar with 2 tablespoons of molasses added
- Freshly grated ginger: use 1 teaspoon ground ginger if you can’t get fresh ginger
HEALTH MADE EASY:
if using canned pumpkin puree, choose organic | make your own puree using “pie pumpkins”, which is a pretty simple process | since it makes 3 pies, you can either bless someone else with one or freeze them for up to a couple months | the fresh ginger really makes a difference in the taste, I prefer fresh over ground
What is your favorite autumn recipe that makes you smile from ear to ear?
The post Spiced Pumpkin Pie with Flaky Pastry Crust appeared first on Day2Day Joys.
]]>The post Make Your Own Leaf Press appeared first on Day2Day Joys.
]]>
Written by Karen @ To Work With My Hands, Contributing Writer
Fall is here and soon the ground will be adorned with the gorgeous array of rich-colored leaves.
Every year my children collect the prettiest leaves they can find, bring them inside, and it sometimes looks as if there must be a tree growing somewhere inside our house! They simply love the beautiful, showy leaves of fall, and so do I.
Quite a few years ago, when our oldest boys were still pretty small, my husband helped me make our own leaf press. For years we’ve used it and untold numbers of leaves have been preserved in its layers.
This year, I decided it was time to add a second press to our collection. The leaves are already making their way indoors, and I want to be able to preserve as many as we can for fun fall crafts, and just for the joy of experiencing their beauty a bit longer.
The supplies are few and inexpensive, and the press will last for years – long after your leaf-collectors are grown and probably have their own little ones.
If you have easy access to a table saw and scrap lumber, you can make one even more economically. Although I do have access to both, our busy fall schedule kept me from having easy access to the people who could operate the saw :), so I chose the craft store route this time instead.
You can make your press any size you like, but keep in mind that a very large press will be more difficult to manage or take with you on nature outings. We like the size and portability of a press that is one square foot or less in size.
Make Your Own Leaf Press
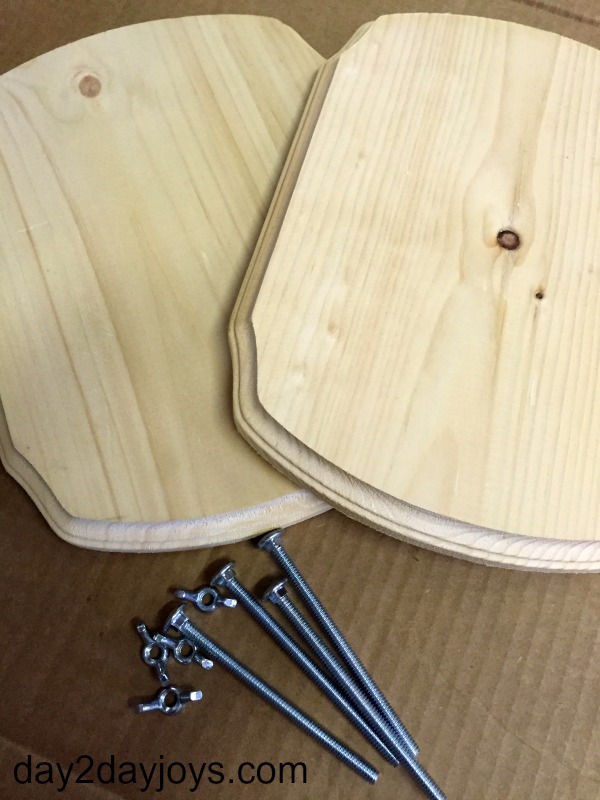
Here’s what you need:
- 2 pieces of wood, 1/2-inch thick
- 4 stainless steel bolts (we used 4″)
- 4 wing nuts to fit the bolts
- 8-10 pieces of cardboard cut to fit the wood
- craft paint (optional)
- drill press or electric hand drill
- clamps
-
Here’s what you do:
If you use lumber, such as plywood, cut two pieces in the size you want, creating a rectangle or square. Our first press was an 8-inch square and worked great for little hands.
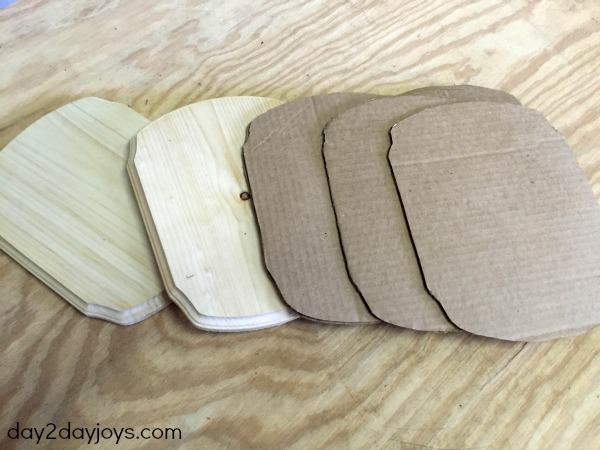
Alternatively, you can purchase pre-cut and routed unfinished plaques at craft stores. The ones I used in this press were purchased at Michael’s for $3.49 each. (If you have their app on your phone, you can use their mobile coupons too. They typically have a 40% off any regularly-priced item every week just like Hobby Lobby does.)
Next, Cut as many pieces of cardboard as you would like for your press – I cut 8 for ours. Lay one of your pieces of wood onto an opened cardboard box and trace around it. Using a craft knife, cut the pattern out. Repeat until you have as many layers as you like.
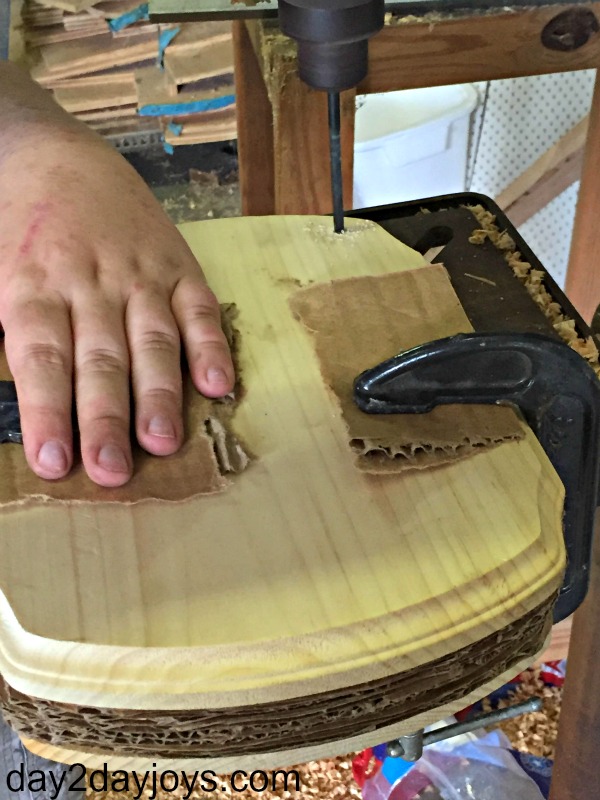
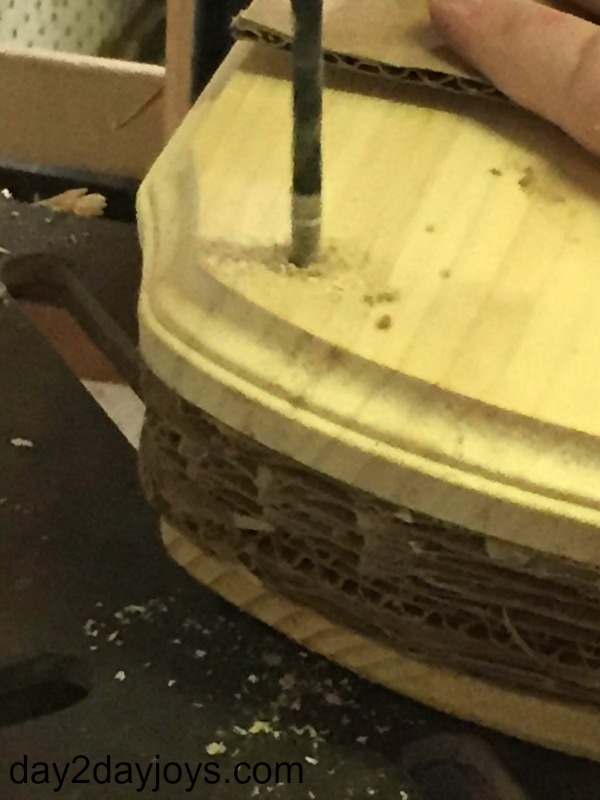
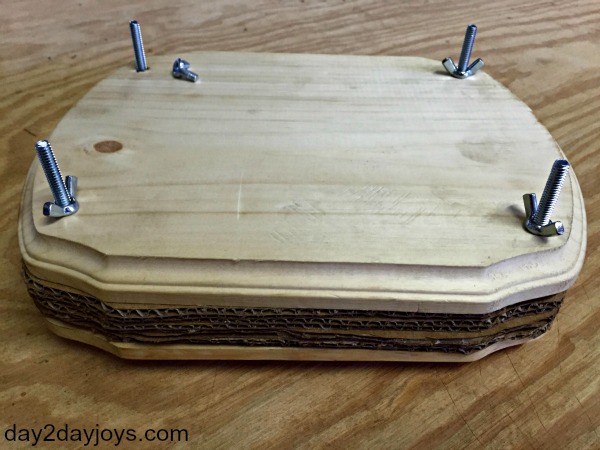
Stack the cardboard layers between the two wood layers and clamp to hold them steady while you drill the holes. To prevent the clamps from marring the wood, slide an extra piece of cardboard between the wood and clamp before tightening.
With the layers secure, you can now drill the holes. We chose 1/4″ bolts and used a 5/16″ drill bit (This is where I was stunned by how much my 11-year old knows about using a drill press and choosing and changing bits. My husband has done a fantastic job of teaching our boys to do the shop things, and I’m so grateful!)
If you don’t have a drill press, you can also use an electric hand drill.
Once the holes are drilled, check the fit of your bolts before removing the clamps. Screw the wing nuts onto the bolts, and remove the clamps.
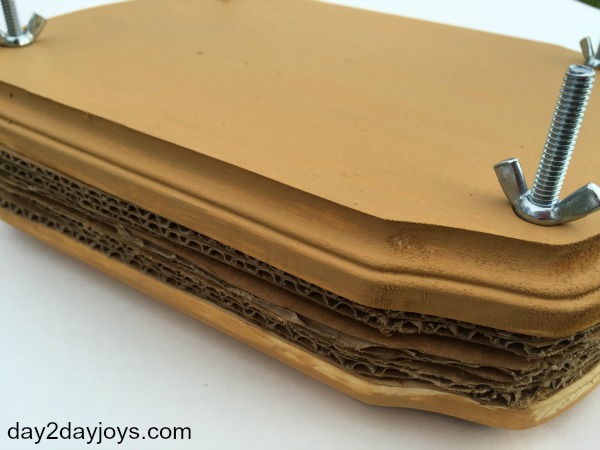
Your leaf press is finished!
If you want to dress your press up a bit, you can give the top and bottom a few coats of craft paint. We left our first press natural and after so many years of use, it has become quite dirty.
You could also decorate it with pressed leaves using Modge-Podge, or hand-paint a beautiful scene. Use your imagination and have fun.
Using the press:
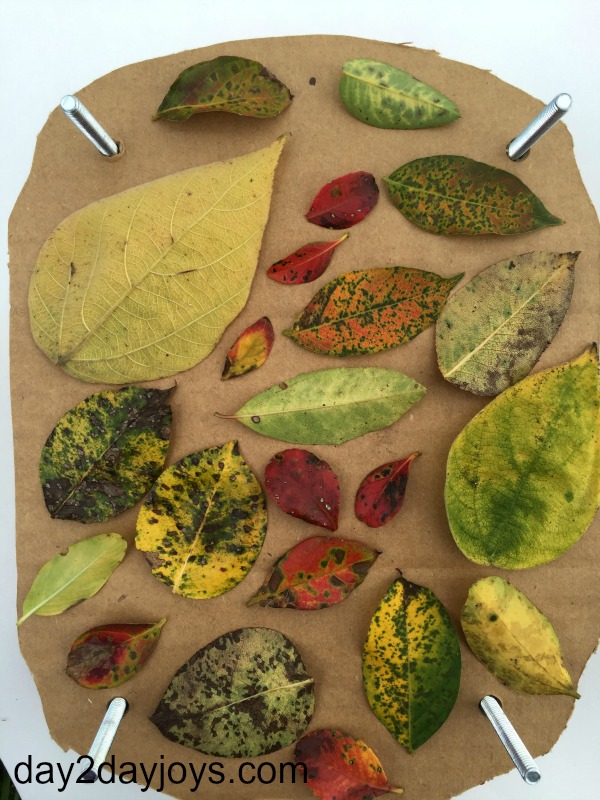
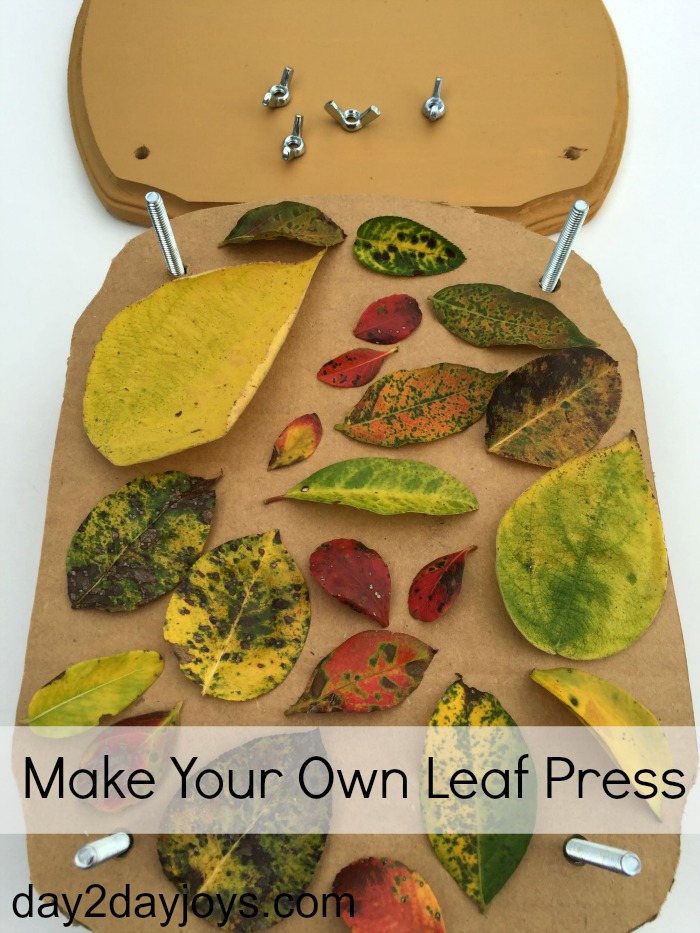
After collecting your leaves, lay them in single layers on the bottom piece of wood, taking care not to overlap leaves even slightly.
When there’s no room left, place a piece of cardboard on top of the leaves, carefully sliding it down the bolts. Repeat until you have as many layers as you need.
Place the top piece of wood on last, and screw down the wing nuts as tightly as you can.
Check the leaves after a week. If they aren’t completely dry, screw the nuts down again and give them a few more days.
When the leaves are dry, carefully remove them from the cardboard layers. Some may be quite brittle, so take care to remove them gently.
Making your own leaf press is fun and easy and a great way to get your kids involved one step further in the process of enjoying fall leaves.
Your press isn’t just for fall, however! You can use it in the spring and summer to press beautiful grasses and flowers too. It’s a wonderful way to expand nature study and preserve specimens that are otherwise short-lived.
One of our favorite pressed leaf projects has been using this book to create nature scenes with our leaves. Look What I Did With a Leaf! is filled with inspiring and creative scenes made exclusively with pressed leaves.
Tip: It’s a good idea to put a small mark on the correct side of the top or bottom of each piece of cardboard. Likely the holes are not totally interchangeable, and unless they are in the same position as when you drilled them, you may have some binding.
Do your children collect fall leaves? How do you enjoy the beautiful, yet short-lived colors of fall?
The post Make Your Own Leaf Press appeared first on Day2Day Joys.
]]>The post Felt Fall Banner appeared first on Day2Day Joys.
]]>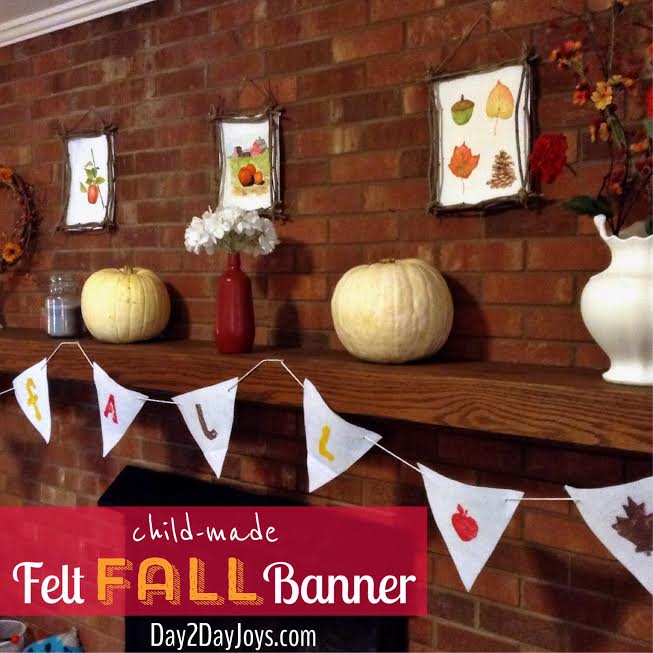 Written by Lisa @ This Pilgrim Life, *NEW* Contributing Writer
Every year we decorate the mantle for Fall. And every year the routine is basically the same.
Pull off current decor. Pull out boxed Fall decor.
Turn on Christmas music (I know, I know. But this year I have a good reason).
Try to find an arrangement of things we already have on hand or have acquired cheaply that suits our simple, clean style.
Send pictures to my best friend for a second opinion. Because she is a decorating guru. And I am not.
For the past couple of years, I have been able to count on more help than just from my best friend. My children are joining in on the action.
Like most things, they are eager to do whatever.Mommy.is.doing. We cook together. We sew together. And now we decorate together.
Sometimes this means finding random pinecones on surfaces that are in their reach. Sometimes it means reminders not to let their dinosaurs eat all the fake fruit. Almost all the time it means candles. They are big on the candles.
And I say, just go with it. Embrace their participation as a part of the family tradition. Let it be a special time. Prioritize memories over Pinterest-worthy mantles. (Not knocking Pinterest! I know it is a crucial source of inspiration for the decorating-challenged like me). Give them license to be creative and the opportunity to enjoy the work of their hands.
This year, try letting your kids join you in making this simple Fall banner. (If you’re really brave, you can invite friends over for a felt painting extravaganza).
Chances are good that you already have some of these materials stashed away in a cupboard or closet. And those you are missing can certainly be acquired cheaply. Plus, the stamps are quick and easy to make. They may be a new favorite here. (I’m thinking Christmas cards…)
How to make your own fall banner:
Materials Needed:
- 1/2 yard felt
- craft paint
- styrofoam plates
- corks
- paint brushes
Instructions:
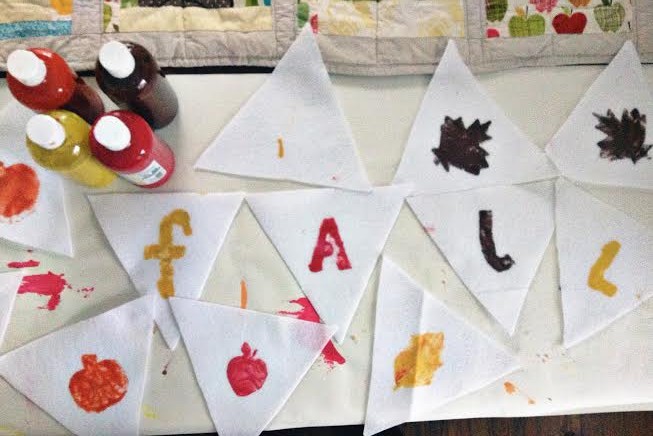
1. Cut the felt triangles. Cut out a triangle from cardstock to use at your guide. [Cut a square 8″ x 8″. Draw a line from each top corner to the center bottom and cut.] Use this to cut as many felt triangles as you can. (Trust me, having some extras is a good thing).
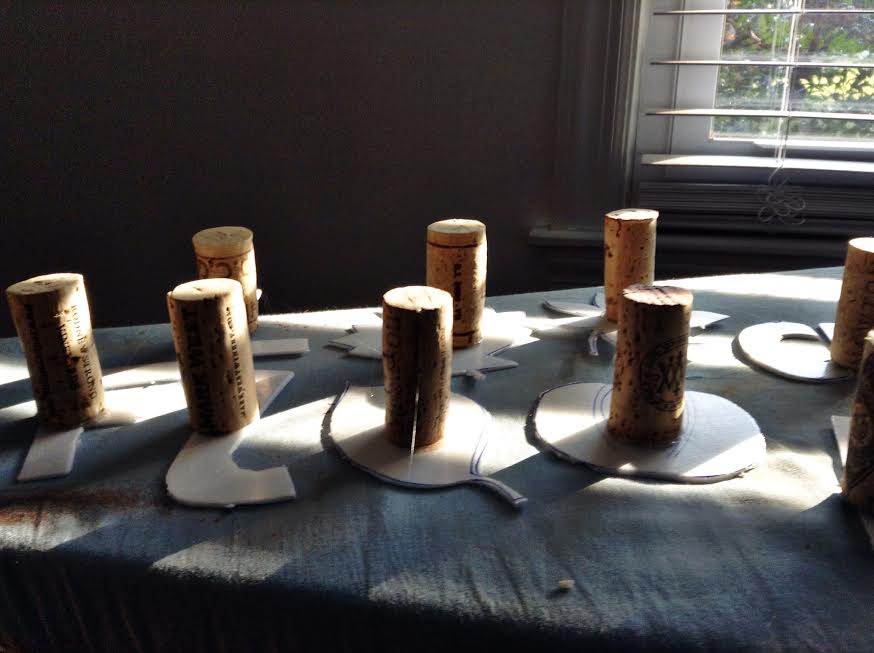
2. Make the stamps/stencils. Draw the letters and/or shapes in the center of each styrofoam plate. Carefully use an exacto knife to cut each shape out. Go slowly so the styrofoam does not tear or snag. Now you have one stencil (the plate) and one soon-to-be stamp (the cutout).
Hot glue a cork to the center of each cutout and let dry.
Voila! Stamps.
3. Set the table, (the craft table). Cover the table with paper or a plastic tablecloth. (I use rolls of craft paper from IKEA for this. Easy and inexpensive). Pour paint onto uncut styrofoam plates to use for dipping the stamps. Pour paint into another container to use to dip brushes in for the stencils, (we used an empty plastic egg carton). Set out the stamps, stencils and triangles.
Even if you are only doing this with one or two children, having the supplies ready from the start is a major time and stress saver! Don’t skip this step.
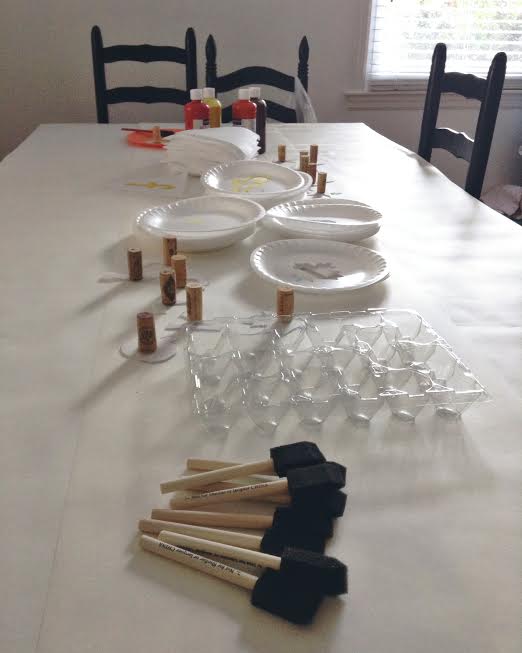
I neglected to pour the paint before the kids gathered. I wished I had remembered because waiting is soooo hard.
4. Paint the triangles. Gather around the table and get to work! (And if you’re like me, take a deep breath and remember that part of the beauty is the kid-ness of it all. Or just make plans to go back and add a few of your own pieces to the banner. No shame either way).
After each triangle is stamped or stenciled, let it dry in a safe spot.
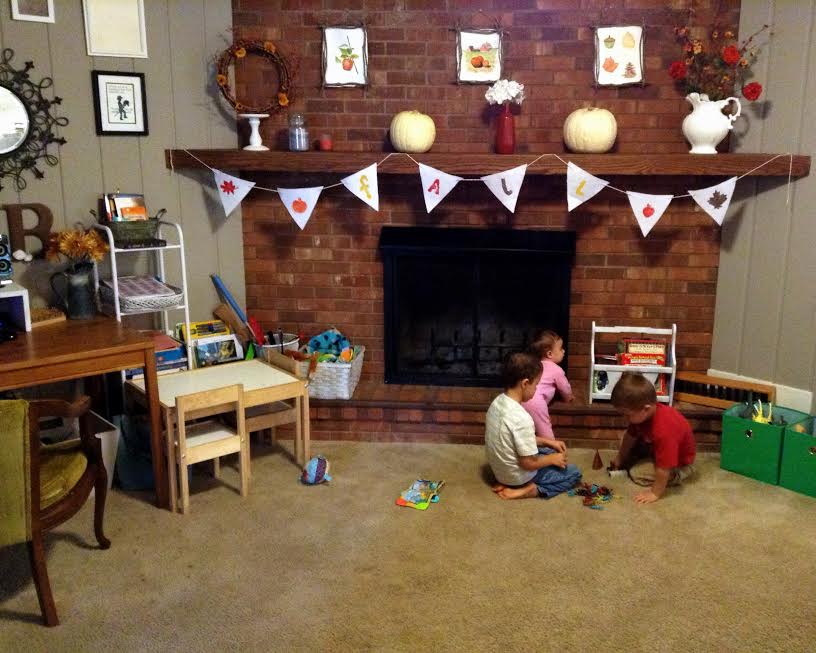
5. Make the banner. Take the dry painted triangles and lay them out in the order you want them. Cut two small slits in the top corners of each triangle for feeding the twine through. Feed the twine through the pieces and you’re done! (Tip: I waited to cut the twine until I hung the banner on my mantle so I could determine just how long I needed it and how spaced out I wanted the triangles).
6. Hang your banner!
Happy Fall! I hope your season is filled with crackling fires, pumpkin flavored everything, and extra-special memories!
The post Felt Fall Banner appeared first on Day2Day Joys.
]]>The post 5 Ways to Fall into Fall (without costumes) appeared first on Day2Day Joys.
]]>
Written by KT @ One Organic Mama, Contributing Writer
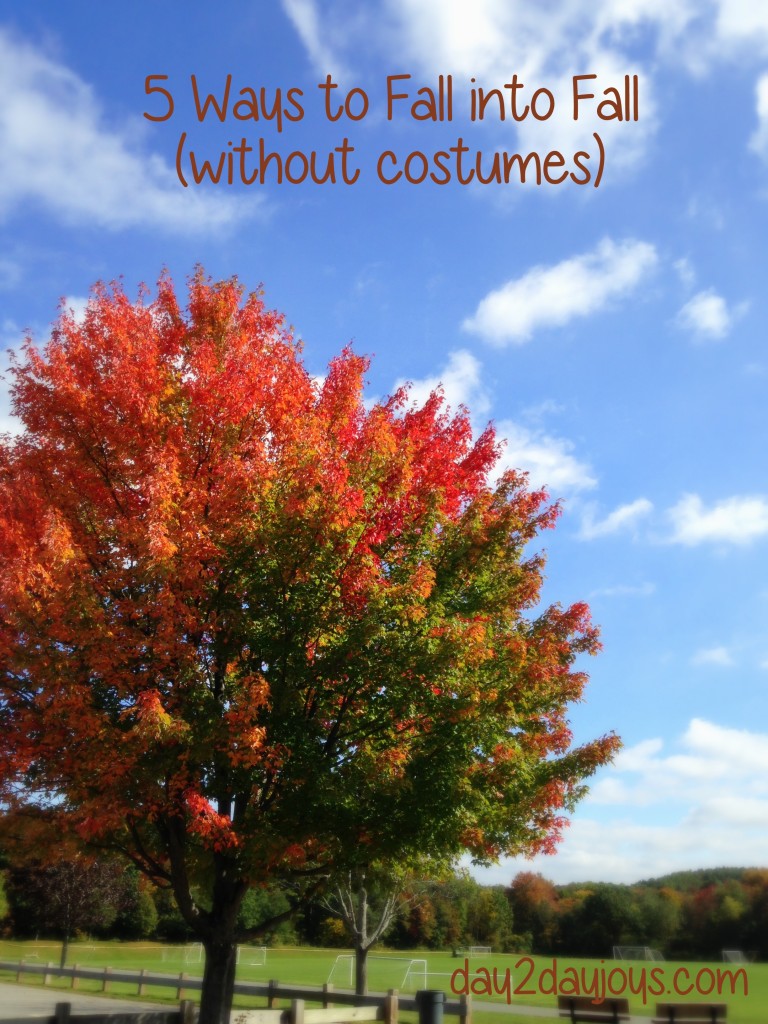
Fall is a time of crisp air, changing seasons, and winter preparation in the Northeast where I live. I like to take time to really enjoy this season before the winter comes… because despite living here my whole life… I just can’t stand the winter! Here are 5 ways to really enjoy and appreciate this most beautiful harvest season!
5 Ways to Fall into Fall:
Signs of Fall Walk/Hike
Gather up your kids and get outside. Take a walk on your street or a hike in a local state park and record all the signs of fall you see. Smaller children can draw and older children can record their observations. What are signs of fall? Changing leaves, the smell leaves and plants decomposing, small animals gathering food for the winter (my son was VERY concerned about a squirrel’s “DANGRUUS” behavior running back and forth across the street), fungus growth, flowers drying/dying, migrating birds, nuts and acorns everywhere, etc.
Apple Picking
It is a typical fall activity and we are surrounded by apple orchards – see if there is one by you! Usually there are tractor rides and apple cider donuts, and lots of hoopla, but sometimes you can find a quiet farm where you and your kiddos can wander around, climb the trees, and snack on apples all day! When you get home crisp, pie, a smoothie, and applesauce are all possible! This applesauce recipe is an easy (REALLY EASY) way to make applesauce that even the smallest eaters in your house will enjoy… and you can make it in the crock pot while you’re playing outside).
Leaf Rubbing
While you’re out hiking and walking collect lots of (dry) leaves. Instead of focusing on color, focus on SHAPES. Choose lots of leaves with different shapes. When you get home, arrange the leaves with your kiddos, under a piece of white paper, and gently rub them with crayons (it’s easiest if you remove the paper from the crayons). Choose fall colors to make your picture look like the leaves outside!
Crock Pot Cooking
Fall is time for warm foods, soups, and a cozy kitchen. Set your crockpot up in the morning with the evening’s meal. Choose something that is seasonal and that you can use some of those winter squash you have been growing all summer. I like this Thanksgiving in a Crockpot.
Make a Fall Feeder
All those little animals getting bulky for the winter can be fun to observe. Grab some pine cones, or toilet paper rolls, and slather them with peanut butter. You can dunk them in birdseed, or sunflower seeds, and then hang them close to your house. Your children will enjoy waiting patiently to see who visits the feeder… it can really be an exercise in remaining quiet and observing animal behavior too!
How do you and your family welcome and enjoy fall before winter comes?
The post 5 Ways to Fall into Fall (without costumes) appeared first on Day2Day Joys.
]]>
